Pre-courseSections and cardsWhole-course preview

Whole-course preview

Pre-course SIV, 7 sections, 25 lessons (24 published, 1 draft). Staff only, students never see this page.Back to editorPreview as student

Logistics

4 lessons
Lesson 1 of 25

General Information

PublishedOpen as studentEdit
A place to stay
We will meet at the landing zone only on the first day. On the second and third days, we will meet at the Cable Car. You might consider booking your accommodation near Malcesine, as there are a lot more options for bars and restaurants than near the landing zone.
Dry clothes bag
Please bring a bag with your second pair of clothes and shoes, in case you end up going into the water. It is nice to be able to change your clothes without going back to your hotel. We will keep it with us at the landing zone for ease of access.
Communication
Before and during our course all of the communication will be done through Telegram Group make sure you join the group.
Radio Communication
You will be given a radio with an earpiece to use during the course. Pre-programmed, fully charged. The radio is USB-C chargeable, you’ll keep the radio with you for the course. Please make sure you charge it every evening.
Life Vest - Seago Active 300
You will be given a life vest during our pre-course briefing and gear check. You’ll keep the same life vest for the duration of the course. If you land in the water, the first landing is on us.
Second landing costs 50 euros for the recharge of the life vest, as the compressed air canister will need to be replaced.
Dry bag for electronics
We will provide you with a 2-liter dry bag to store your electronics during the flight. If you land in the water, at least your electronics and wallet will stay dry.
Lesson 2 of 25

Welcome to your Pre-Course

Draft, not liveEdit

Students do not see this lesson yet. Staff see it here so the whole course reads in order.

Welcome

PLACEHOLDER lesson - replace with real content in /admin/content. This proves the PCKB index + reading view end-to-end.
Lesson 3 of 25

Arrival

PublishedOpen as studentEdit
We will meet in the morning at 7:00 am for the gear check and a short briefing at the Landing Zone.
Bring your gear ready to fly. We will provide you with pre-programmed waterproof radios with an earpiece a 300 N self-inflating life vest and a 2-liter dry bag for your own electronics.
Please bring a set of dry clothes in a small bag that we can keep for you at the landing zone, in case you go into water, you’ll have a spare set of clothes to change.
Lesson 4 of 25

Logistics

PublishedOpen as studentEdit
Cable car to Take-off
The cable car up to take-off has two prices.
Till 09:00 and after 15:30 it is 11 euros one way up - discounted price for paragliding pilots
From 10:00 till 15:30 it is 19 euros - no discount.
Tickets should be bought online only. This has been requested by the Malcesine tourist board, as they aren't thrilled that paragliding pilots take up so much space in the cable car with our gear, and they've asked us not to do the same at the ticket office. Buying online is easy and should be done at least 5 minutes before the window to go up.
Landing Zone to Cable Car
There is a taxi service from landing zone to Cable Car. It costs 3 euros per pilot per ride.
The taxi drivers like to have 4 pilots minimum.
Meeting point for the taxis is at the entrance near the Paragliding Bar.
Between runs, you organize your own taxi back up to the Cable Car. There's no flagging one down: either call ahead yourself (see Contacts below), or head to the taxi meeting point and check if other pilots are already there. Ask if anyone has already called. If not, call yourself.
If there's a queue at the base station, it's worth asking the driver to take you straight up to the middle station by road instead. It's not guaranteed, since it depends on the driver and how busy the road is, but it often skips the wait entirely and costs nothing to ask.
Contacts
  • Matteo - +39 3xx xxx xxxx
  • Luca - +39 3xx xxx xxxx
After each flight you will have an individual de-brief and briefing for the next flight. Once packed, self-organize your ride back up (see above).

Preparing for your SIV

1 lessons
Lesson 5 of 25

Preparing for SIV

PublishedOpen as studentEdit
FLYING KARLIS · SIV RECOMMENDATIONS

Preparing for Your SIV

Lake Garda. What to do in the months, days and mornings before you fly, so the course is spent learning instead of catching up.
An SIV course costs you money, time, travel and a fair amount of emotional energy. Most of what decides how much you get back from it happens before you clip in. None of what follows is complicated. It is the simple things, done consistently.
You will notice that most of it is about not breaking a routine you already have. If any of it feels like a big change, try it out weeks before the course, not on the morning. We want the day itself to feel like business as usual.

MONTHS AHEAD

Build a checklist, and turn it into a ritual
Launch is busy and your head is already on the flight. Your heart rate will be up before you take a step. Dr Matt Wilkes describes that state as sympathetic activation, and it measurably degrades working memory. That is the mechanism behind almost every forgotten buckle in the sport.
A checklist covers the gap. A ritual on top of it calms you down. The best ones combine something physical, something you do with your breath, and something you say to yourself.
Write your own version rather than borrowing mine. Think back through every mistake you have made before launch, take the ones you have made more than once, and put those on the list. Print it, laminate it, and put it somewhere on your harness.
A WORKED EXAMPLE
BEFORE YOU CLIP IN
Helmet · Reserve pin · Buckles · Life vest · Radio and earpiece · Dry bag · Sun cream · Water
BEFORE YOU LAUNCH
Wing · Lines · Brakes · Twist · Wind · Look and call · Breathe · Go
Work down the first column beside launch while you get ready. Work down the second when the wing is laid out and you are about to go. The breath before the last item is the point of the whole thing.
Condition your shoulders, back and hamstrings
Your neck, shoulders, back and hamstrings work as one chain. Keeping that chain strong and flexible is what stops shoulder and back pain turning up on day three, and it is the same chain that keeps you comfortable on long flights at home.
The reason it matters on an SIV course specifically: your arms and core accumulate fatigue across repeated runs, and fine control of the wing goes first. You will still be able to fly. You will not be able to fly precisely, which is the whole point of being there.
General fitness is worth more than any single exercise. Matt's recommendation is a broad mix of cardiovascular work, strength and flexibility, because that combination also improves your G tolerance, your concentration and your stamina.
Learn the Anti-G Straining Manoeuvre
A spiral at 6 to 10 m/s will pull 2 to 4G. Done well, the Anti-G Straining Manoeuvre gives you back up to 3G of that. That is the difference between managing a spiral and simply enduring one.
It is simple. It is also useless unless it is automatic, so practise it on the ground until you do not have to think about it.
  • Anticipate the G. Start before it arrives, not after.
  • As you feel the pressure build, tuck your legs up against your harness and tense your legs and abdominal muscles.
  • Breathe in and begin to say the word “Hook”. About three quarters of the way through, just before the K sound, close your throat and hold for 2 seconds, building the pressure in your abdomen further.
  • Exhale strongly, finishing the word “Hook”.
  • Rapidly inhale, beginning the word again.
  • Repeat until the G releases.
The AGSM, and the physiology behind it, comes from Dr Matt Wilkes. Worth knowing alongside it: your G tolerance is not a fixed number. It drops at the start of the season, and it drops when you are tired, dehydrated, ill, cold or hungover.

THE DAYS BEFORE

Come early, and go and look at it
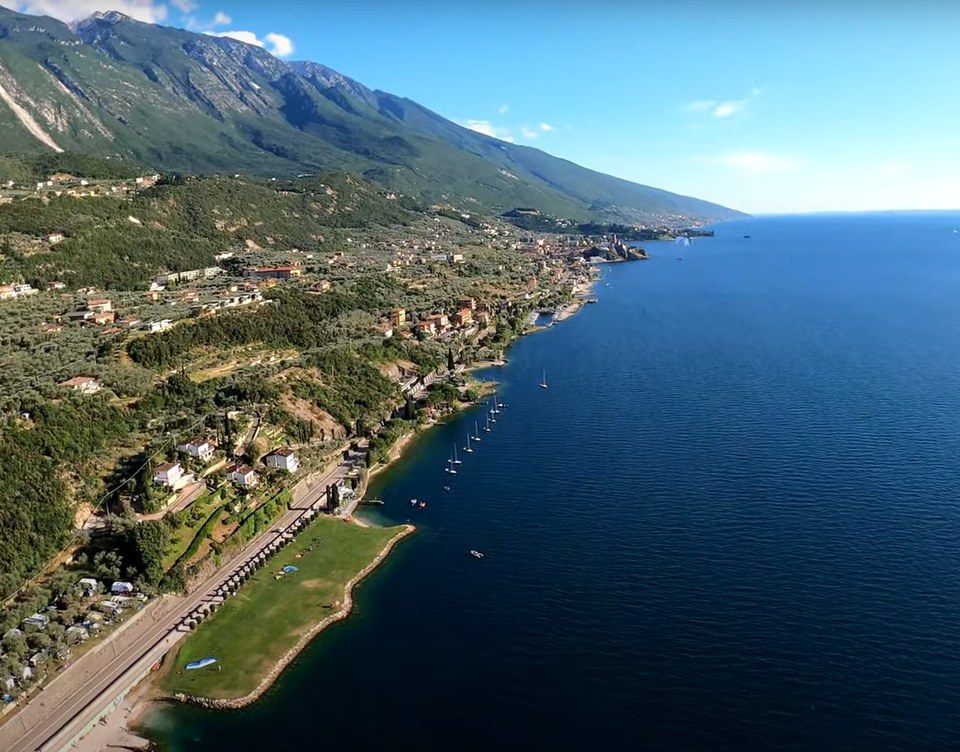
If you arrive with time and the conditions suit you, fly the site the day before. Even a top to bottom is worth it. You come up on the gondola from Malcesine and launch from a meadow at 1,750 metres. The landing zone is at 90 metres, right by the water, and it is narrower than it looks, with boulders around the edge towards the lake.
Flying it once means that on the first morning of the course you are not spending attention on the geography. You will need that attention elsewhere.
If you cannot fly, still go and stand on launch, and still go and look at the landing. Ten minutes of that takes a surprising amount of pressure off the next day.
Eat, sleep, and go easy the night before
  • Eat a normal dinner and arrive at the morning already hydrated, not planning to catch up.
  • If you usually drink most evenings, keep it to a maximum of 2 units. If you do not, skip it. A hangover dehydrates you, tires you, cuts your capacity to learn and focus, raises your chance of motion sickness, and lowers your G tolerance. That is four separate ways to waste a day you paid for.
  • Go to bed at your usual time, aiming for at least 7.5 hours. Sleep is when the day's learning is consolidated, so this is not a comfort question.
If you are crossing time zones
Roughly one day to adapt per hour of difference. Flying in from the east coast of the United States, that is around six days to be fully adjusted. Holiday time is precious and I know that is a lot to ask. But if you have travelled this far to fly, arriving a few days early is the cheapest performance you will ever buy.

EACH MORNING

Breakfast, coffee and water
We meet at 07:00 at the landing zone for the gear check and a short briefing, so you have time to eat and digest before the first flight.
  • Eat a normal breakfast. Whatever normal is for you.
  • Have your usual tea or coffee. Caffeine has measurable effects on performance, which is exactly why the course day is the wrong day to start drinking it or to give it up. Skip the energy drinks unless they are already part of your routine.
  • Drink at least one glass of water before you leave. Start the day hydrated and staying hydrated is easy. Start behind and you will not catch up.
IN YOUR BAG
  • 2 litres of water. Leave the bottle in the van, and only carry it in the back of your harness if it is a soft container.
  • Lunch. A mix of complex carbohydrate and protein.
  • Slow release snacks, something like trail mix.
  • Cash, in case you want anything from the lake front.
  • Sun cream, factor 30 or higher.
  • Cap or hat.
  • Sunglasses.
  • A set of dry clothes in a small bag. We keep it for you at the landing zone.
Sun
The sun comes off the lake as well as out of the sky, and it is stronger than it feels at 1,750 metres in a breeze. Sunburn dehydrates you, distracts you, costs you energy, and does long term damage on top.
  • Pick factor 30 or higher. Matt's point on this is that SPF numbers are close to meaningless in practice, because they vary so much with skin type and conditions. So do not read the number as a promise, just go high.
  • Sunscreens are either physical, using zinc or titanium oxides, or chemical. Both can irritate and both can cause reactions. Find one that works for you at home and bring that one. The morning of a course is a bad time to discover a new sensitivity.
  • If you do get burned, use simple painkillers and aloe vera, drink a bit more, and leave any blisters alone. Burned skin gives you no protection at all, so cover it for the rest of the week.

EACH DAY

Visualise on the way up
The gondola ride is time you would otherwise spend getting nervous. Use it. Run the flight through in your head, including finishing the maneuver properly.
Make it detailed. The more immersive it is, the better it works, so direct it like a film: the angles, the sounds, the pressure in your hands, what the wing looks like above you, how it feels when it comes right.
Look after yourself through the day
  • After you land, eat and drink little and often. The goal is to never feel thirsty and never swing your blood sugar, not to have a big lunch.
  • On a hot day, or if you are sweating, take a little salt alongside the water. Crisps or salted peanuts do the job. Matt's reason for this: water needs some solute, salt or sugar, in it or alongside it to be absorbed efficiently from the gut. Artificial sweeteners are metabolically inert, so a diet drink does not help here.
  • Hat on, shade where you can find it, and top up the sun cream through the day.
Sleep, again
At least 7.5 hours, every night of the course, not just the first. The link between sleep, circadian rhythm and performance is not in dispute. Sleep is what turns what you did today into something you still have tomorrow, and it is what keeps you flying well on day four instead of surviving it.
Requirements vary between people. 7.5 hours is the typical minimum before you start building a debt.
None of this is a rule. You are the pilot in command, on the ground as well as in the air. Take what fits how you already live and leave the rest.
Where the physiology comes from Dr Matt Wilkes is a paraglider pilot and a doctor specialising in human performance in extreme environments, based at the University of Portsmouth. He holds a master's degree in Mountain Medicine and a PhD in pilot physiology and safety. He has led large international expeditions, run high altitude clinics in Nepal, and flown across East Africa with the AMREF Flying Doctors. He contributes to Cross Country Magazine and advises the British Paragliding Racing Academy. The sympathetic activation and checklist reasoning, the conditioning and G tolerance points, the Anti-G Straining Manoeuvre, the sleep and time zone figures, the hydration and solute point and the sunscreen guidance are all his.
Mandatory safety

4 lessons
Lesson 6 of 25

Safety briefing

PublishedOpen as studentEdit
Welcome to safety briefing, here you will find things that will keep you safe during the course.
How to communicate if you want to stop.
Pull in big ear on one side. I will then get on radio to communicate to see if that is what you mean. You then pull in the big ear again to confirm.
If you have access to your radio you can use it to communicate. But normally it is just me communicating with you, because your radio is stowed away for the course.
If you can communicate with me, by all means do so, otherwise big ear is the international sign for - I want to stop.
If you did not understand the command.
If the radio has malfunctioned at a crucial moment, cut out or wasn’t clear and you did not understand what I’ve asked you to do. Do nothing.
If you try and do something that I have not asked and you don’t have enough height for the maneuver you're doing, it might surprise the both of us and you might not have enough height to get back to the shore.
If you haven’t understood what I’ve asked, do nothing. I will then get back on radio and explain to you again and I will use different words. I’ll slow it down, I’ll say it more clearly. Once you understand what is going on do the maneuver.
If you have radio problems.
And you can’t sort them out during your flight, it is then your responsibility to keep yourself in the box. I will be watching, the boat will be in the water and you will be filmed, so all the safety aspects will be there. Just do the maneuver that you are comfortable with, as you won’t be able to get the direct feedback from me. But keep an eye on where you are in the box as I won’t be able to reposition you in the box.
Even if this is your first flight, make sure you don’t waste your flight. Do something you are really comfortable with, I will be watching and you will be filmed. At least I will be able to de-brief you after the flight and you won’t waste your flight.
This is really important point - You are always pilot in command. That goes for take-off, landing and during the whole flight.
Take-off
The conditions on take-off are yours to judge. Pay attention to the cycles, to the airspace, to your gear, and to your checks.
There is no instructor on take-off. The landing zone sits at 90 metres and take-off is at 1,750. That is too far apart to see what is happening at the other end, so we have an assistant on top who works as the instructor's eyes and ears. Who is on take-off, who is ready to fly, who has gone. That is the whole job.
The assistant does not teach and does not give an opinion on the conditions. Nobody up there is going to tell you it is a good time to fly. You are pilot in command. The decision to take off is yours.
In the box.
During your flight, my perspective can be very distorted. You need to have a good look around before you start your maneuver, to make sure your airspace is clear. There can be quite a few other pilots in the air in the box, remember you are the pilot in command always.
Checking-in with yourself.
It is also very important that you check in with yourself, I might be asking to you to do something. You might be getting tired and feel like this is not something you are able to do right now. Or I might be asking you to do something and you might not feel comfortable to do that particular maneuver that close to the lake. Again you are always the pilot in command, it is your responsibility to decide if you are comfortable with doing that maneuver or not.
Two way communication.
It is essential to maintain two-way communication throughout the course. If the days are long or it is hot, I need to know how you are doing mentally. Please provide feedback after every flight regarding your level of tiredness, dehydration, or hunger. Constant feedback is necessary for me to customize the course based on your current state.
Landings
With landings we will always leave you with enough height to take you in for landing.
Lake Garda’s landing is quite narrow and it can be quite windy. Make sure you go through the Site Briefing section to better understand the recommended landing approach for Lake Garda.
Reserve throw
I have written separately about reserve throws here.
You need to Look, Locate - Pull and throw in one go. As you release your reserve keep looking at it, follow it with your eyes till it opens. If it does get tangled in your lines or paraglider, then you’ll need to locate your reserve bridles and pull on them as hard as needed to help get some air into your reserve to help it open up.
If you have steerable reserve, you need to kill your wing a bit more before you start controlling your reserve, if possible try to point it into wind before landing in water, this will limit your ground speed.
If you have a round or square reserve you can leave as much wing as you like, it will create some more drag, just make sure to take energy out of the wing.
Water landings
Once you are in the water, do not try to use your legs to stay afloat. Your life vest will hold you up. To keep your head clear of the water, turn and look at the sky. That is easier than trying to swim.
The vest takes a second or two to inflate. It fires on water pressure, not on humidity, so it will not pop the moment you touch the surface. Wait for it. Once it inflates it is large, and it will hold you and all your gear up even if you are unconscious.
There is a dedicated rescue boat on the water for the whole course, on our radio, listening in. Usually more than one boat comes for one pilot. They are watching before you know you need them. If you exit a maneuver low and far from the landing zone, they are already moving, and they will have you out within seconds.
When the boat reaches you, the crew deal with your reserve first if you threw one, then they come for you. Grab the boat as soon as it is close enough. When the boatman pulls you in, pull yourself in at the same time. Two people pulling is faster than one.
You do not need to undo your harness in the water. Stay in it. The vest and the boat do the work.
Lesson 7 of 25

Site Briefing

PublishedOpen as studentEdit

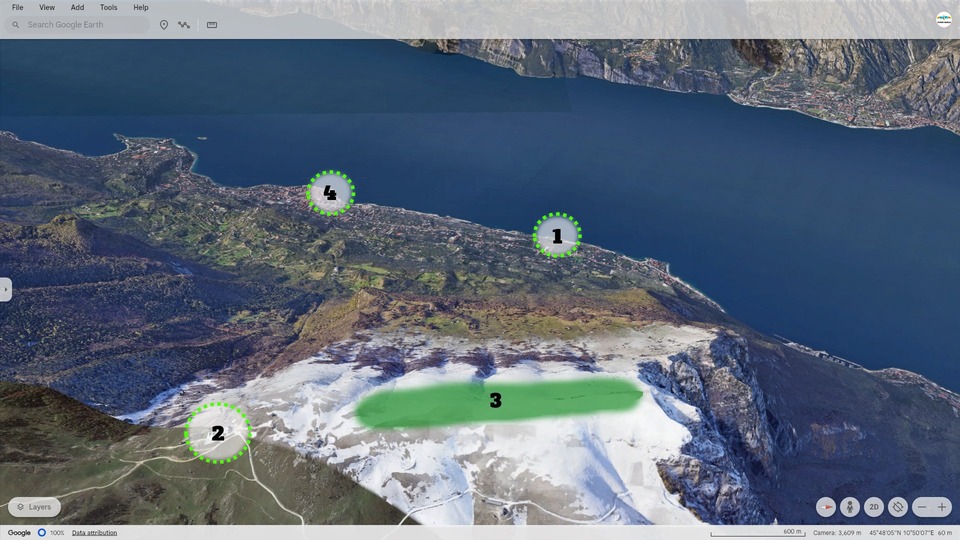
TAKE OFF AREA

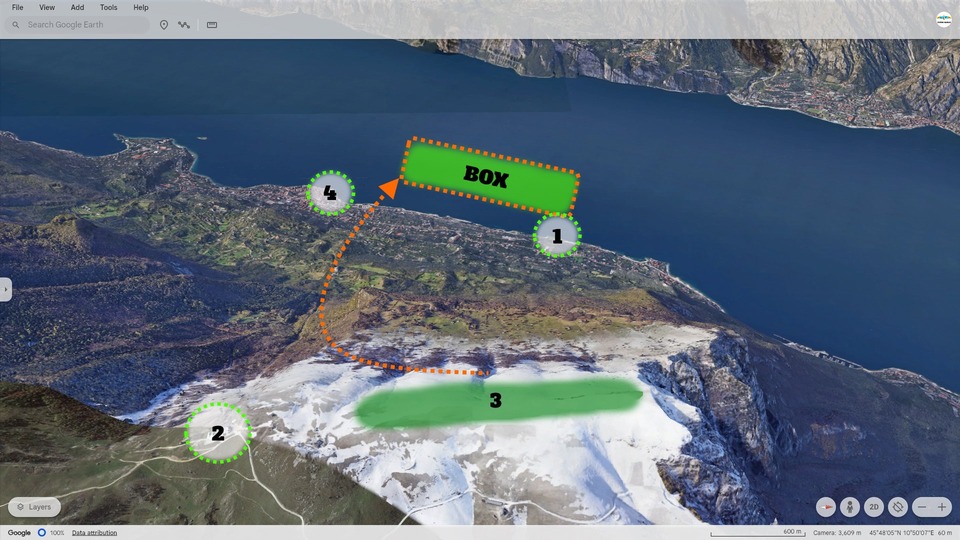
Take-off area map showing landing zone at 90m AMSL, gondola ski lift arrival point, take-off meadow at 1750 AMSL, and Malcesine town location
Nr 1 - Is your landing zone at about 90m AMSL.
Nr 2 - Is where you will arrive on top of the mountain with the gondola ski lift.
Nr 3 - Take-off area, it is a large meadow at 1750 AMSL.
Nr 4 - Malcesine
With South winds on the lake, you will be taking off towards WSW direction on the top. This is quite straightforward, after take-off you want to hug the mountain to head towards South parallel to the terrain, just before you reach the cables of Gondola that brought you up. Then follow those cables to the town Malcesine. This route tends to be the most efficient to get to the South box.

THE BOX

This is the area where we practice.
Defining factor for the box is wind and altitude.
Think of it like this - what if I throw my reserve right now, where would I end up landing?
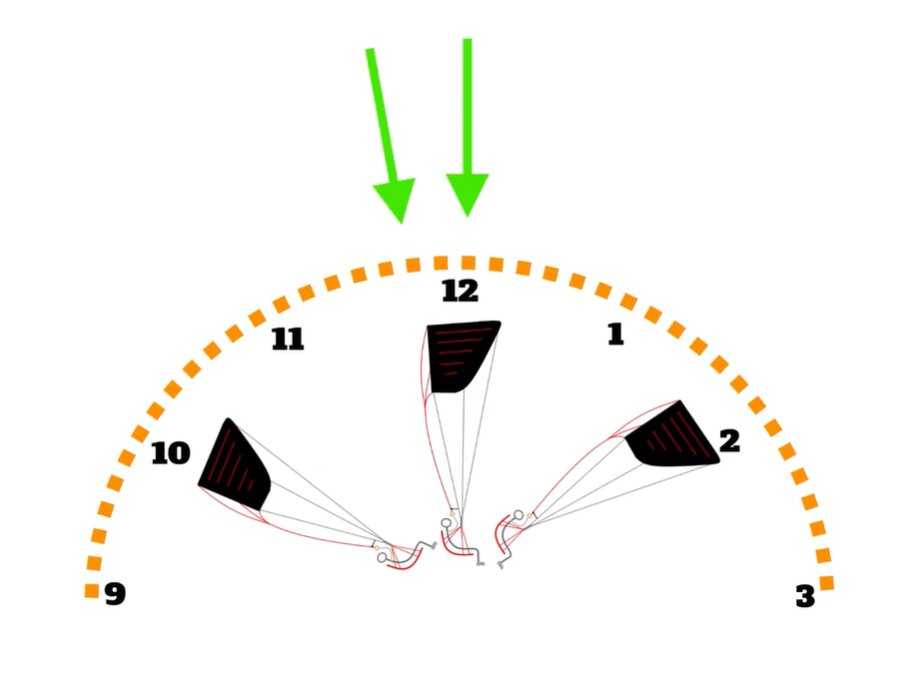
The box’s dimensions change before every flight and during every flight. As the wind speeds increase, you will have to go more upwind to make sure you are in a good box. If the wind speeds are lower, then flying more direct towards landing zone makes more sense as there will be less drift while you’re doing your practice inside the box.
Lake Garda is known for its winds. They regularly change directions. In the morning we will have North wind on most days, that will switch to South Wind before afternoon. This valley flow then will increase in strength just to slow down in late afternoon and repeat the process.
Wind speed and direction can change with altitude as well, you might have North wind up high and South wind as you getting lower. Box will be adjusted throughout the run. Don’t worry, your instructor will assist and correct the box as needed.

SOUTH BOX

South box flying route map showing westerly wind take-off direction, mountain hugging path, cable car cables path to Malcesine castle
When we have Westerly winds on top, we take-off towards the lake, after take-off we follow the mountain towards South till the Cable car Cables, then we follow those cables towards the Castle or the town - Malcesine. This route tends to be most reliable for optimal arrival in the box above the lake.

NORTH BOX

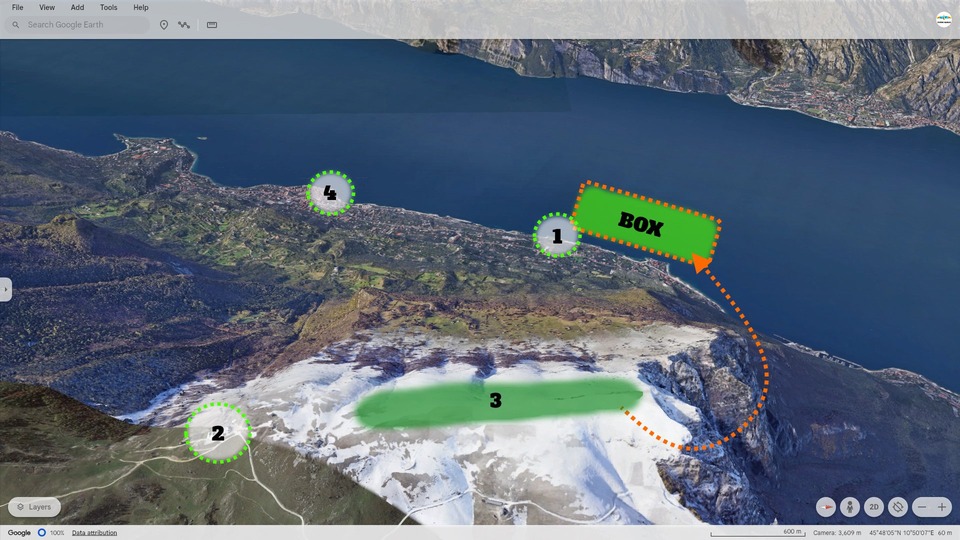
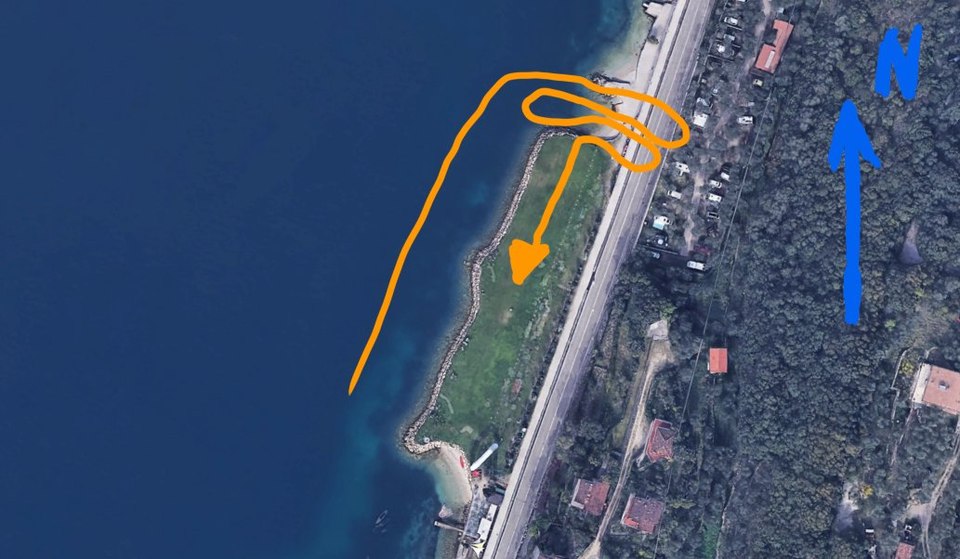
North box flying route map showing easterly wind take-off direction and orange line marking mountain hugging path to lake
With North winds we will have to take-off towards East, hug the mountain around to head to the lake, roughly following the orange line.

LANDING

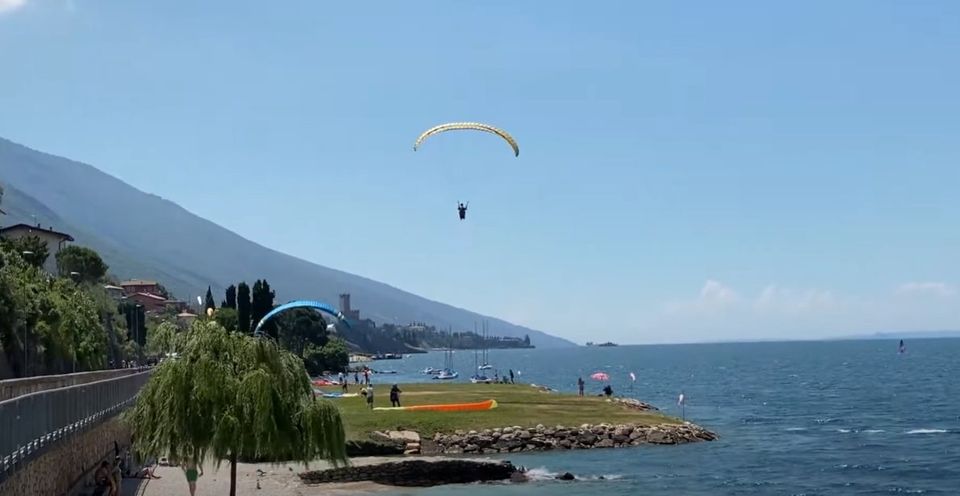
Landing zone conditions showing wind effects and landing field characteristics at Lake Garda
The landing is often windy at Lake Garda, even if the wind is laminar there are a few things you should be paying attention to when coming in for landing here.
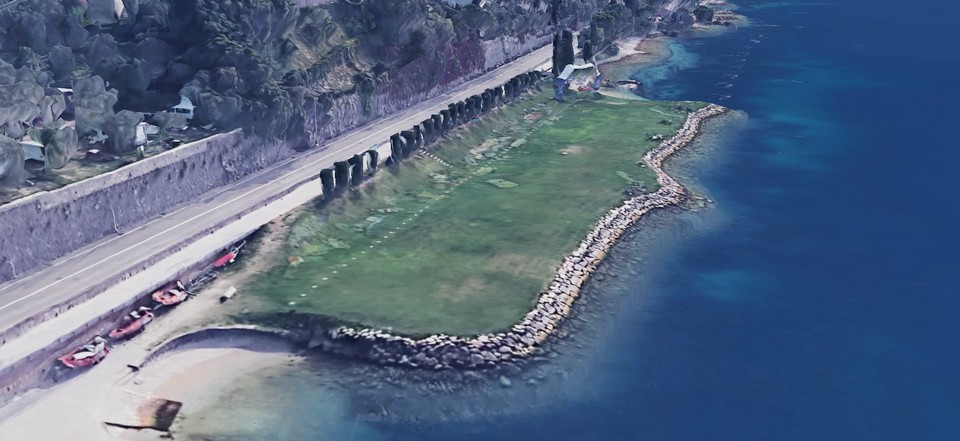
All around the landing field towards the water there are large boulders, that you don’t want to have a hard landing on.
Landing field diagram showing large boulders around the landing area and hazards near the water
The landing appears quite narrow, but 3 wings can share the approach side by side, not recommended, but possible.
There are multiple wind socks around the landing field that will show you wind directions. There are also quite a few boats that help figuring out wind direction.
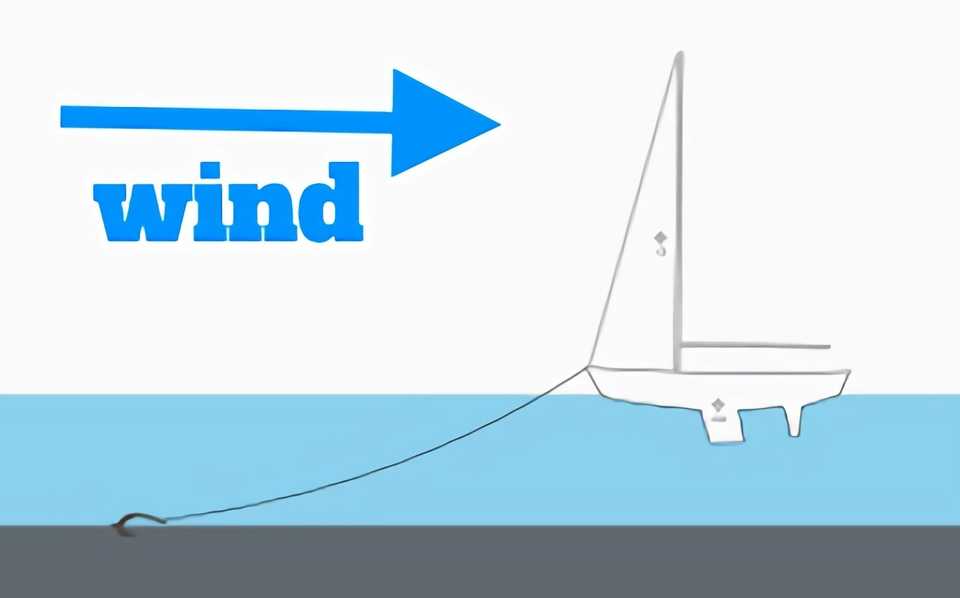
Anchored boat on Lake Garda showing wind direction, with boat facing into the wind
While a boat is anchored down, it will face the wind.
At the landing zone the wind will only be from two directions, from South or North, sometimes the wind will come a bit from the coast, as it hugs around the nearby terrain.
Wind direction diagram at landing zone showing south and north wind patterns with coastal terrain effects
It is important that you leave enough height to have enough time to judge the wind speed and based on that adjust your approach for landing.
In strong winds it is not recommended to do downwind turns low, as you will increase your ground speed drastically and might not turn back in time to make it to the landing zone.
Instead using a crabbing technique, sliding away from landing field and back to it while not moving forwards or backwards. Staying right above it and gradually losing height, tends to work more consistently.
Landing approach diagram showing crabbing technique for descent, sliding away from landing field while maintaining position
If it is windy enough, sometimes it is enough just to add a bit of brake pressure to lose some height, you can see in the video below, the pilot is actively piloting the wing while losing height vertically. Also notice that as he gets closer to the ground, his sink rate increases, this is quite typical situation to happen here, as you get lower you get some turbulence from nearby obstacles.
Lesson 8 of 25

Reserve Packing - Double Opening

PublishedOpen as studentEdit
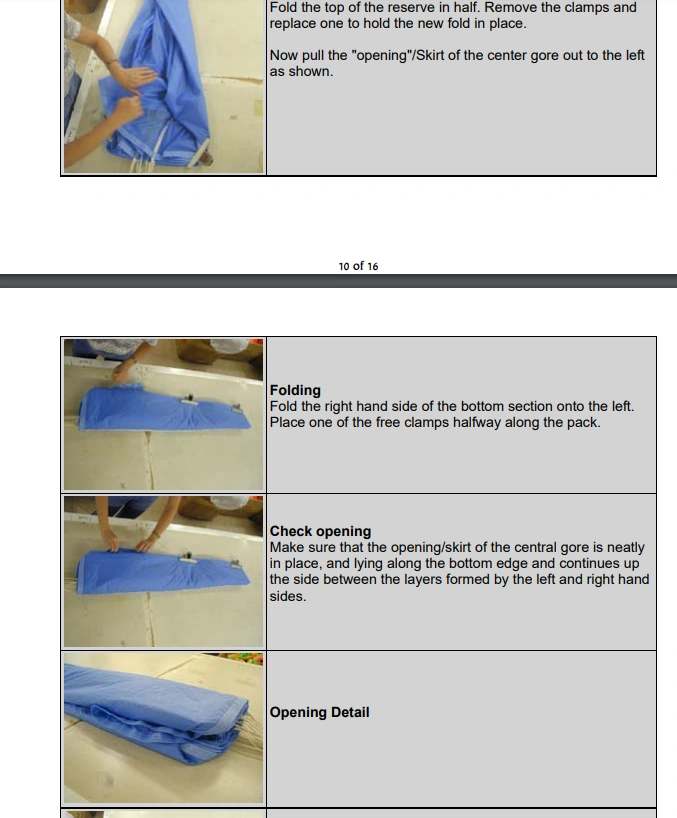
As part of our gear check, we will offer you a choice: keep your reserve packed according to manufacturer specifications or repack it for faster opening.
Part of EN certification for our reserves is a Shock Test. This simple test involves dropping the reserve from a helicopter with its maximum weight and letting it accelerate to 40 m/s descent speed before deployment.
Like all strength tests, the certification must consider worst-case scenarios. In paragliding, there are two scenarios where we can theoretically reach 40 m/s descent speeds: dual carabiner breakage or a full cascade of line breaks. Both scenarios result in free fall. Considering the time it takes for a pilot to react, locate, reach, and throw the reserve, estimates show we would reach just under 40 m/s before reserve deployment.
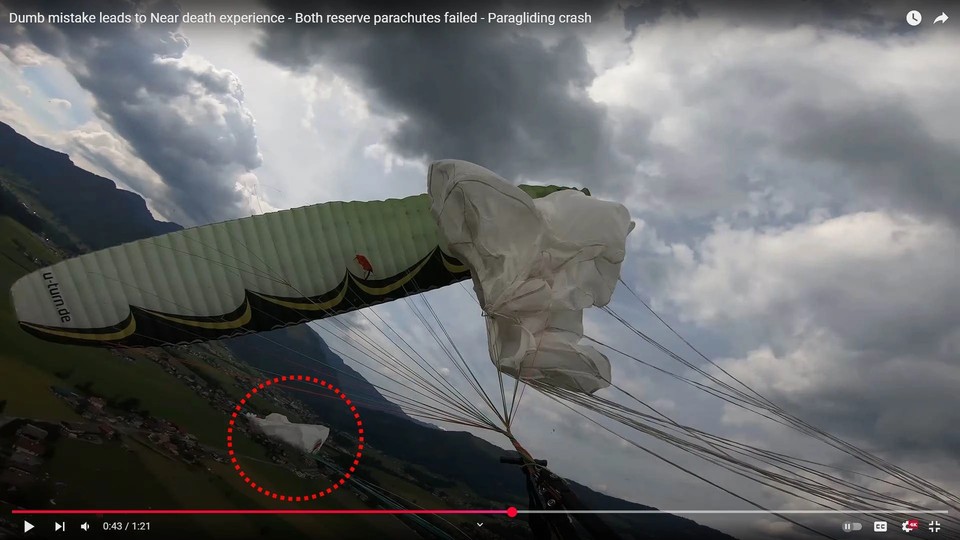
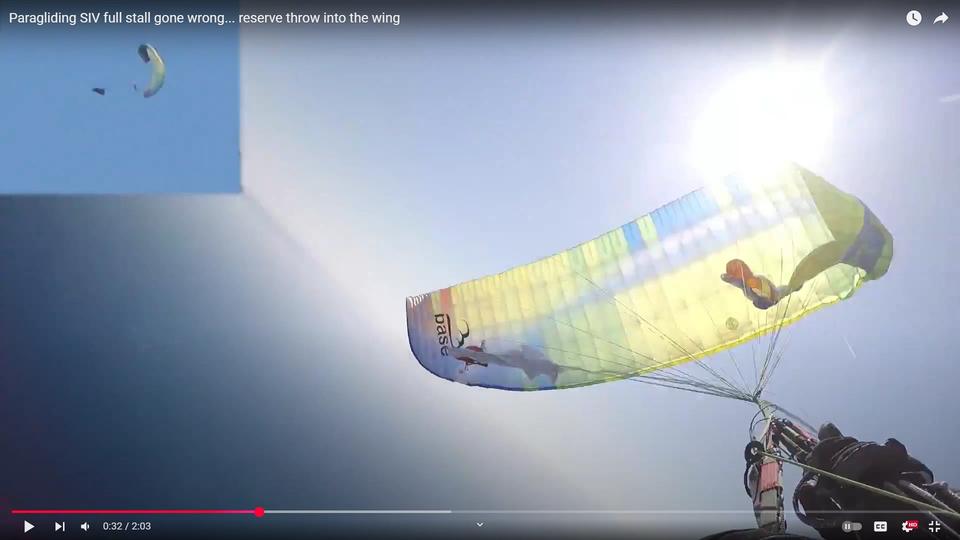
There are several issues with this approach. First, as pilots, we prefer lightweight reserves, but lighter means less strong. Manufacturers often pack these light reserves for slower opening to help them pass the shock test. Second, in real flying conditions, we spend most of our time close to the ground. If we need to throw our reserve, it's usually near terrain, which means we want the fastest possible opening. Third, the most common emergency scenario is auto-rotation, a SAT-like configuration where the wing flies forward while the pilot moves backward. With a slow-opening reserve, the wing often catches the reserve before it fully deploys, resulting in entanglement and deployment failure.
As pilots, we want to get the reserve out of the harness and as far away from us as possible, with the fastest possible opening. This is crucial when we're close to terrain or in auto-rotation, scenarios that are more likely than the extreme cases where we enter free fall.
We'll discuss the specific differences during the course. For now, here are some comparison videos showing different packing methods.

Two phase opening vs Standard Opening.

Reserve deployment showing slow opening with leading edge folded, causing tangling in lines
Here’s the full video
In the picture, you can see that the reserve is not opening quickly. Looking closely, you can see that the leading edge (the fabric closest to the lines) has been folded on itself. This makes it somewhat aerodynamic, causing air to flow around it instead of getting between the fabric layers to help it open. The slow opening keeps the reserve folded long enough to become tangled in the lines.
Here’s another example, where a slow opening reserve, has been caught by the wing.
Reserve caught by wing during entanglement scenario showing deployment failure with slow opening
Here’s a video of Two Phase Opening - Click Here
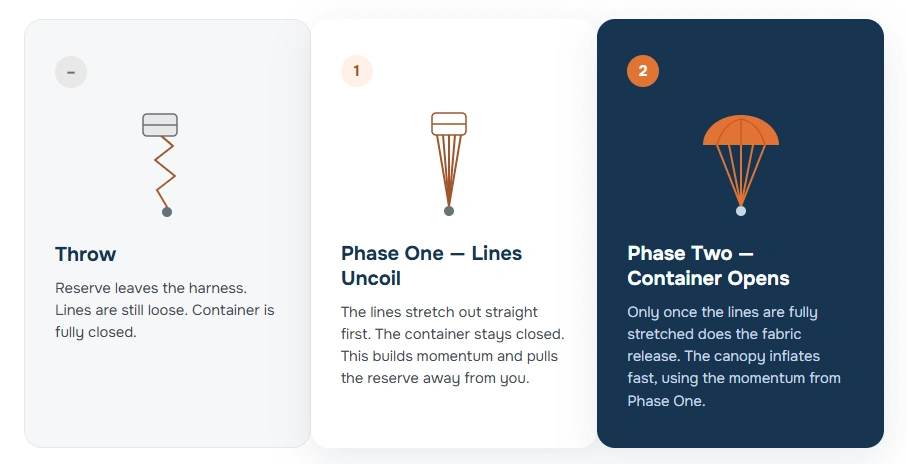
Double opening technique showing reserve flying away from harness with lines opening first
The reserve flies away from the harness, the lines open first, this is the first step of opening, only once the lines are fully stretched, the fabric of the reserve starts to open.
Double opening sequence showing lines fully stretched then fabric opening with momentum
This is what I mean by two-phase opening: the lines open first, followed by the fabric.
When the lines open first, they create momentum for the reserve and help it deploy. As the lines are opening, gravity adds to your initial throw force. Once the lines are fully stretched, they pull back on the reserve, causing it to open faster.
The Beamer 3 Reserves are factory packed for two-phase opening, these are bigger and stronger reserves, this is why they can pack them to open fast. Here’s the Packing Manual for Beamer 3
Beamer 3 manual enPDF file

Different types of packing

To compare, you can have a look at Apco Mayday reserves packing manual.
manual maydayPDF file
Reserve packing showing aerodynamic fold that slows opening compared to optimal packing
When you fold the reserve on itself and fold the leading edge like this, it will slow down the opening a lot. Like you can see in the first two videos higher up.
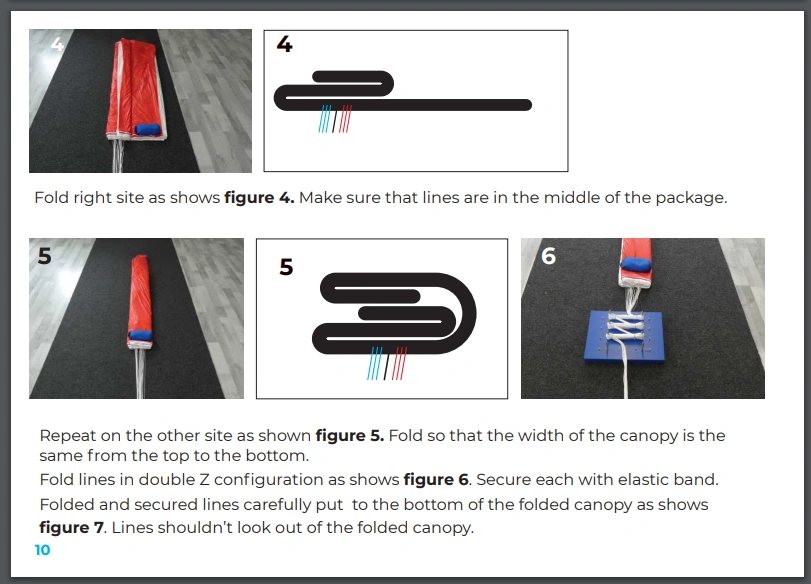
You want the reserve to be as loose as possible, with multiple openings near the air intake, to help it open fast.
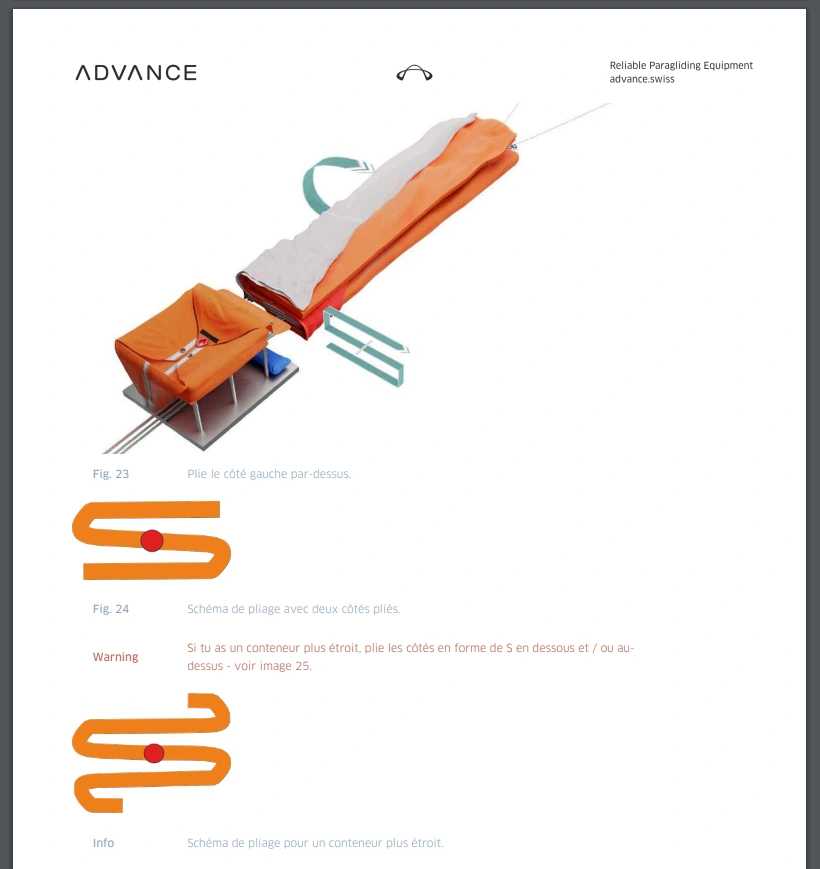
Here’s another example of folding on itself, one side of the reserve is aerodynamic, meaning that the air will freely fly around it and do nothing to help opening it.
Manual-S-120 -EPDF file
S-type packing with aerodynamic fold versus optimal packing with air intake on both sides
Where an S like this will have air intake on both sides.
manuel sqr light2-FRPDF file
Simple S-type folding method for reserve packing with air intake on both sides
Here’s a simple S type of folding, this is quite a good way to do it, except for that the lines and fabric will be opening at the same time, there is a simple trick to upgrade this to two-phase opening.

For me I always pack my own reserves as follows.

Summary

In theory, repacking your reserve for fast opening carries a small risk of breakage during free fall. To minimize these extreme scenarios, regularly replace your harness carabiners. I recommend changing aluminum carabiners annually, while steel ones can last 2-3 years before replacement.
Full line breakage is extremely rare, as long as you fly recent wings and maintain them properly, this should not be a concern.
Lesson 9 of 25

Throwing your reserve

PublishedOpen as studentEdit
First of all if you ever hear me say the word - Reserve! Then throw your reserve. You might be thinking that you almost got it sorted, but you might be under certain height and it is no longer safe to try and fix the wing.
If I don’t say reserve and you think you should throw it, then by all means go for reserve, remember you are always the pilot in command. You might be twisted, that I might not have seen or you might be dizzy or disorientated or about to pass out.
Don’t wait for me to say the word reserve you can throw it if you ever feel the need to do so.
How do you throw your reserve?
Look, Locate - Pull and throw in one motion above the horizon. As hard and fast as possible.
Once you’ve let go of the bag - watch it leave. That way you’ll see if your bag gets stuck or if it goes into your wing or lines. It is very important that you keep looking at the reserve and make sure it opens, if it gets stuck you’ll have to pull on the reserve bridles or lines with a nice hard tugs to help it inflate.
Once the reserve is inflated you’ll be able to see it, or if not, you’ll feel it.
Don’t think too much about where you throw it, just throw it towards the horizon and then deal with it. If you do have a good situational awareness, try to throw it towards the trailing edge of the wing, it will give more time for the reserve to open. Instead of throwing it towards the leading edge, as then the wing will catch the reserve sooner and has higher likelihood of tangling the reserve
After your reserve is inflated, take some energy out of your wing, make sure you pull C lines or B lines to deflate your wing. And make sure you grab the lines not the risers, as far from your body as possible, this will give you more authority on deflating your wing. You can also use your breaks as well, in this case you’ll have to keep wrapping the brake lines around your hands as much as needed to stall the wing.
If you have a round or square reserve keep most of the wing open, as long as it has not much energy in it, it will create extra drag and help with the descent rate. If you have steerable reserve you’ll need to collect your paraglider before you start using the controls of your wing. If possible try to turn into the wind before going into the water, this will help with your ground speed.
Remember - once under fully open reserve, keep working on deflating your main wing. Once the wing and reserve are open they will fight each other, sometimes the reserve will have more load, sometimes the wing. The goal is to wait for the reserve to take the load, then pull in your main wing as much as possible, once the wing regains load, hold it. Till reserve gains load again, and then pull in some more of your wing and hold. Repeat the process, till your wing is neutralized.
It’s a lot easier physically to pull in your main wing, while your reserve has the load.

Mandatory knowledge

2 lessons
Lesson 10 of 25

Four Fundamentals

PublishedOpen as studentEdit
Fundamentals: unlearn the ground habits that work against you in the air.

BASE OF SUPPORT

When you are leaning back into your harness your balance point is in the right place. All of the straps are tight and fully supported.
You can think of it as the human base of support. It refers to the area between the feet that supports the body's weight. It includes both feet and any other points of contact with the ground or a stable surface. The base of support provides stability and balance during various activities, including flying.
When leaning back into the harness, the base of support is aligned with the balance point, ensuring stability and proper weight distribution. However, leaning forward disrupts the base of support, leading to a less stable position and the potential need to use arms for balance.
If you lean forward during your flight, you change this. You’ve probably been in some turbulent air, finding your abdominal muscles aching, this is because we tend to tense up and lean forward when we are nervous.
If we lean forward in our harness we have a different balance point and we are much more likely to lose our balance and start using our arms to compensate to find that balance.
Maintaining a balanced and relaxed posture by leaning back and trusting the harness helps to optimize the base of support and enhance stability during flight.

DISSOCIATING OUR ARMS

Dissociating our arms refers to the technique of separating the movement and involvement of our arms from our overall body posture and balance while flying. By imagining that wet paint has been applied to the harness, the goal is to maximize contact between our back and the harness, in other words, get as much of the wet paint on your body as possible. Allowing us to fully trust the harness and lean back further.
This increases our base of support, providing greater stability and reducing the need to use our arms for balance. By pushing our knees out and tucking our legs under, we further increase the base of support and create a more enveloped and secure position in the harness.
This technique helps prevent the unnecessary use of arms and allows for a more relaxed and stable flying experience.
The main difference between a pod harness and a seated harness is the position of the legs. In a pod harness, the legs are extended outward, while in a seated harness, the legs are bent.
It is important to note that regardless of the type of harness used, the key factor for stability and safety is to bend the legs. This helps to counteract twisting forces and maintain a more balanced and secure position in the air. By training oneself to bend the legs during dynamic situations, pilots can mitigate the risks of twisting and compromised situational awareness.

FULL BRAKE RANGE

In order to control our wing in as many situations as possible we have to be able to use the full brake range. Over time, pilots settle into a certain amount of brake input that they are familiar with, and are not comfortable going past those limits.
I would like to compare this to something that most of us are very familiar with. Imagine that you would only be willing to use 10-15 % of your steering wheels potential while driving a car.
This is something that we understand clearly that there are situations that requires to use more steering wheels travel than normal. The same is true in paragliding.

SITUATIONAL AWARENESS

Situational awareness is a crucial skill for paragliding. It refers to the ability to perceive and understand the current state of the flying environment, including factors such as wind conditions, nearby obstacles, and the position of other pilots.
By maintaining situational awareness, pilots can make informed decisions and adjust their flight accordingly. This includes anticipating potential hazards, recognizing changes in weather patterns, and staying alert to the overall dynamics of the flying environment.
Situational awareness plays a vital role in ensuring safety and making efficient and effective choices while paragliding.
We will be working on improving your situational awareness throughout the course.
Lesson 11 of 25

Maneuvers - Course overview

PublishedOpen as studentEdit
Our curriculum is created in order of importance, if you want to build a house, you have to start with a good foundation. As we spend most of our time while paragliding in a rotation, it is important to understand and do our best to master the control of all the energies and axis there are during a turn at different energy levels and speed.
We use all of these maneuvers in the course to develop the Four Fundamentals
During our work on the maneuvers these concepts are super important to understand. All of these will be practiced in every single flight.
This is the overview of the main maneuvers, we might add others to help you get through in case you get stuck on one maneuver or another.
There are quite a few other maneuvers we can work on, the goal of the pre-course is to go through the main ones, all the rest is only after the maneuvers above are dialed in.
Our aim is to get you better at your own speed, one step at a time. We want to make you a more confident and aware pilot. We spend as much time as you need at any one maneuver, till you fully understand it and are able to do it on your own. How many maneuvers you’ll be able to do during one course entirely depends on you.
ROTATIONS
Natural Exit - 1st exercise
Rapid Exit - 2nd exercise
  • Same knowledge as for Natural Exit
  • Practice Natural Exit first
  • Understanding of - Exit Brake
To prepare for Auto-Rotation we will first need to do some work with collapses. Usually these two exercises are done while working on Rapid Exits, in the same flight we will add one or both of these maneuvers to switch things up and to do the work necessary to prepare you for Auto-Rotation.
COLLAPSES
Asymmetric Collapse - 3rd exercise
  • Knowledge needed before exercise
  • Asymmetric Collapse exercise description
  • Briefing before doing the maneuver
  • Experience needed
  • Roll Control to keep the wing from rolling, even when the wing is collapsed the same principles apply.
Frontal Collapse - 4th exercise
  • Knowledge needed before exercise
  • Frontal Collapse exercise description
  • Briefing before doing the maneuver
  • Experience needed
  • None, the wing does everything itself.
  • This is done to show that the wing is more than capable to recover from such an event as long as the pilot does not make it worse.
  • Late Catch and Release is crucial here.
Auto-Rotation rapid exit - 5th exercise
  • Knowledge needed before exercise
  • Auto-Rotation description
  • Briefing before doing the maneuver
  • Experience needed
  • Rapid Exit - Consistency during rapid exits, separation between all 6 stages.
  • Asymmetric Collapse - able to keep the wings heading with asymmetric collapse and cancel the roll while having the wing collapsed (finesse)
  • Roll Control
Cravat Clearing - 6th exercise
Back fly - 7th exercise
  • Knowledge needed before exercise
  • Back-fly description
  • Whip Effect - Hands up!
  • Briefing before doing the maneuver.
  • Experience needed
  • Catch & Release - Pitch control - Pilot needs to be comfortable to catch late and hard, to avoid re-stall
  • Asymmetric Collapse - - We can come out of back-fly with cravats, it is good to be aware how to keep the wing fly straight, keep the directional control before clearing the cravat.
  • Frontal Collapse - This helps pilot to trust the wing, that if it does a frontal, it isn’t a big deal.
  • Rapid Exit - In case of asymmetric exit, the wing can shoot asymmetrically and put you in nose down spiral.
  • Auto-Rotation - It is possible to have a cravat after exiting and it can pull into Auto-Rotation, pilot needs to be aware and needs to know exactly what to do in this situation.
  • Fly With Wraps - pilot should be comfortable using wraps, as in some wing/pilot/harness configurations it might not be possible to stall the wing without using wraps and or it might be too difficult to control the Back-fly
Spin Appreciation - collision avoidance
Spin Appreciation - 8th exercise

The maneuvers - core skills

4 lessons
Lesson 12 of 25

Catch & Release - Pitch control

PublishedOpen as studentEdit
During the course we will use this expression a lot - Catch & release. We also divide the common saying - Pitch Control in two sections Pitch Back and Pitch Forward to clarify the action needed for each.

Pitch Back - hands all the way up.

During pitch back we are looking to have clean trailing edge, this means no brake input whatsoever. As long as we are in pitch back the hands should be up.
As we all have habits especially if we have flown for a while, it is important that during the pitch back we look at our wing to make sure you have hands all the way up. As our hand position changes based on what type of a wrap we are using.
Why is this important?
No matter how much energy we have in a rotation, if we keep our hands up and our trailing edge clean, the wing will not go past about 45 degree pitch-back. The only reason you see wings going more than that in the pitch back, is when pilots add brake input, this helps to generate more energy.
As effectively what you are doing is slowing down the wing, while your body still has inertia. This will “load the wing” (read - add more energy to it), this is what makes you climb higher or in other words your wing to move past the 45 degree angle in the pitch back.
Now that the wing has more energy, and your inertia has run out, you will start falling back to earth as gravity will take over, this will add even more energy to your wing. Creating unnecessary aggressive pitch forward, which if not controlled with full brake input (see Four Fundamentals) can shoot all the way under you before collapsing, or you might have a tumble past the wing or a whip effect. Neither of which is fun.

Pitch Forward - Late catch and release.

Once the wing is passed above our head and is starting to dive forward is when we initiate the catch and release. The following video explains, this in detail.

Over exaggerated late catch and release.

During the course we will ask you to over exaggerate the catch and release. We will also ask you to do so, later and later.
Why is this important?
This does several things. First this trains you to use Full Brake range (one of the Four Fundamentals), as during higher energy maneuvers we will need to use up to 100% of the brake travel to stop the - Pitch forward.
Late catch and release is important for recovery after frontal collapse as well as exits after negative maneuvers, if you start to catch the pitch early after a frontal or a negative (back-fly, parachutal stall) you are risking to re-stall the wing and have a cascade event.
Continue exploring:
Back to: Maneuvers - Course overview
Lesson 13 of 25

Roll Control

PublishedOpen as studentEdit
This video will give you a simple exercise you can practice before coming to the course.

Roll & Rotation regulation

Goal: To control rotations using both brake inputs
This is very useful in our paragliding journey as rotations, or the 360s, are something we use frequently during turns or thermaling practice.
By using both brakes when necessary, we can control the rotations more precisely. During my flights, I always control my wing using weight shift and both brakes. How much I use each brake depends on the situation.
Exercise 1:
  • Enter the rotation using the inside brake.
  • Control the rotation by adjusting the inside brake pressure to regulate the rotation speed.
  • Exit with Natural Exit.
Exercise 2:
  • Enter the rotation using the inside brake.
  • Maintain a steady rotational speed.
  • Apply the outside brake to slow down the rotations while keeping the inside brake constant.
  • Release the outside brake to observe how the rotation restarts and gains momentum.
  • Repeat the process several times.
  • Rapid exit or natural exit.
Exercise 3:
  • Enter the rotation using the inside brake.
  • Control the rotation by alternating between inside and outside brake inputs.
  • Observe the changes in speed and G-Forces.
  • Smoothly exit and bleed out the energy.
Continue exploring:
Back to: Maneuvers - Course overview
Lesson 14 of 25

Whip Effect - Hands up!

PublishedOpen as studentEdit
Here’s an interview with Malin Lobb, explaining the Whip Effect.
Here is an interview with Bruce Goldsmith where he talks about flying hands up.
And here is another video from Bruce talking about letting the wing fly
Continue exploring:
Back to: Maneuvers - Course overview

The maneuvers - exercises (in order)

8 lessons
Lesson 16 of 25

Rotations

PublishedOpen as studentEdit

Rotations

When entering a rotation, gradually apply brake pressure to avoid spinning the wing. Warning signs of entering too soon include excessive yaw movement and dimpling in the wing. To exit a rotation, pass the wing vertically under the exit window and use compensation brake to cancel the roll. Rapid exits require releasing the inside brake, adding the outside brake, and compensating for the roll past the exit window. Situational awareness is crucial throughout the maneuver.

Roll & Rotation regulation

Goal: To control rotations using both brake inputs
This is very useful in our paragliding journey as rotations, or the 360s, are something we use frequently during turns or thermaling practice.
By using both brakes when necessary, we can control the rotations more precisely. During my flights, I always control my wing using weight shift and both brakes. How much I use each brake depends on the situation.
Exercise 1:
  • Enter the rotation using the inside brake.
  • Control the rotation by adjusting the inside brake pressure to regulate the rotation speed.
  • Exit with Natural Exit.
Exercise 2:
  • Enter the rotation using the inside brake.
  • Maintain a steady rotational speed.
  • Apply the outside brake to slow down the rotations while keeping the inside brake constant.
  • Release the outside brake to observe how the rotation restarts and gains momentum.
  • Repeat the process several times.
  • Rapid exit or natural exit.
Exercise 3:
  • Enter the rotation using the inside brake.
  • Control the rotation by alternating between inside and outside brake inputs.
  • Observe the changes in speed and G-Forces.
  • Smoothly exit and bleed out the energy.
Continue exploring:
Back to: Maneuvers - Course overview
Lesson 17 of 25

Natural Exit

PublishedOpen as studentEdit
Natural Exit - 5 sections!

EXIT

EXIT WINDOW

ROLL CONTROL

PITCH BACK

CATCH & RELEASE

The process starts with low amount of energy, we are looking to have clean exits and clean separation between the sections.

Initiation

We initiate a rotation by gradually applying inside brake as described in Rotations

Exit, Exit, Exit.

Your instructor will tell you when to exit, during your first attempts, you’ll hear over the radio - Exit, Exit, Exit. When you hear this, all you need to do is to release the inside brake straight away all the way up. Wing will start to come out of the rotation by itself. Ergo - Natural exit.
With low amount of energy, the roll kicks in almost instantly. The more energy we add to the rotation the later the roll will kick in.

Exit Window

Compensation - Roll

To compensate for the roll you have to apply the same brake that you used to initiate the turn. You are looking to identify the lower wingtip, once that lower wingtip starts to climb back up is when you start to apply the compensation brake.
Once the wing is straight above you - let it fly, hands up - all the way up.
Right side rotation - Right brake compensation
Once the lower wingtip climbs back up and your wing is symmetrically above your head, this is when you let your hand back up - all the way up and wait for the pitch-back.
In a natural exit one thing decides when the roll arrives and how much authority the compensation needs, and that is the energy you put in during initiation. Low energy, the roll comes almost instantly and takes very little brake. More energy, it comes later and takes more. Read that relationship here, while there is only one variable to read. In a rapid exit you add a second one on top of it - Exit brake.

Pitch - Back

During the pitch-back, you should be looking at your wing’s trailing edge, making sure it is clean without any brake input. Hands up - All the way.
If you see the sky go hands up, If you see the water - catch and release.

Late Catch and Release

We are looking to stop the dive forward as late as possible. During your first Natural Exits, there will be very little energy, sometimes there might be no Catch and Release needed. We still ask that you show as a quick catch and release to work on your situational awareness and timing.
This will become increasingly more important as we add more energy during the first stage of the rotations - Initiation.
Here’s some preview how it will sound for you. These videos have been filmed during our SIV’s the radio you hear is exactly what you will be hearing during your course. (except for the water as that is just background sound for the camera)
Just as you enter the BOX - Pre- maneuver briefing - Natural Exit
Here’s a video as a preview on how the instructions will go during the maneuver
Continue exploring:
Back to: Maneuvers - Course overview
Lesson 18 of 25

Rapid Exit

PublishedOpen as studentEdit
The process starts with low amount of energy, we are looking to have clean exits and clean separation between the sections.
RAPID Exit - 6 sections!

EXIT

EXIT BRAKE

EXIT WINDOW

ROLL CONTROL

PITCH BACK

CATCH & RELEASE

Initiation

We initiate a rotation by gradually applying inside brake as described in Rotations

Exit, Exit, Exit.

Your instructor will tell you when to exit, during your first attempts, you’ll hear over the radio - Exit, Exit, Exit. When you hear this, all you need to do is to release the inside brake straight away all the way up.

Exit Brake

The Exit Brake is the opposite brake to the one you used to start the rotation. Turning right, your Exit Brake is left. You apply it about a split second after you release the inside brake, and it is the only thing that separates a rapid exit from a natural one. In a natural exit you release the inside brake and the wing comes out of the rotation on its own. In a rapid exit you release, add the outside brake, and the exit starts there.
The Exit Brake initiates the exit. Applied lightly, the rotation slows down and comes out over the next part of the turn. Applied hard, the rotation stops almost immediately. Applied perfectly, it can take you out in one go, and you will still have some roll to compensate. The compensation is never optional.
The Exit Brake and the compensation brake are different hands at different moments. The Exit Brake is the outside brake, straight after the release of inside brake, to initiate the exit. The compensation brake is the inside brake, the same one you started the turn with, applied later, once the lower wingtip starts to climb back up. Exit brake first. Compensation after.
Your Exit Brake also sets your compensation. In a natural exit one thing decides when the roll arrives and how much authority the compensation needs, and that is the energy you put in during initiation. In a rapid exit there are two. The initiation energy, and the Exit Brake on top of it. The stronger the Exit Brake, the sooner the roll comes back and the more dynamic the compensation has to be. The smoother and lighter the Exit Brake, the later it comes and the gentler the compensation. How you exit decides how you compensate.

Exit Window

Compensation - Roll

To compensate for the roll you have to apply the same brake that you used to initiate the turn. You are looking to identify the lower wingtip, once that lower wingtip starts to climb back up is when you start to apply the compensation brake.
Once the wing is straight above you - let it fly, hands up - all the way up.
Right side rotation - Right brake for roll compensation

Pitch - Back

During the pitch-back, you should be looking at your wing’s trailing edge, making sure it is clean without any brake input. Hands up - All the way.
If you see the sky go hands up, If you see the water - catch and release.

Late Catch and Release

We are looking to stop the dive forward as late as possible. During your first Natural Exits, there will be very little energy, sometimes there might be no Catch and Release needed. We still ask that you show as a quick catch and release to work on your situational awareness and timing.
This will become increasingly more important as we add more energy during the first stage of the rotations - Initiation.
Here’s some preview how it will sound for you. These videos have been filmed during our SIV’s the radio you hear is exactly what you will be hearing during your course. (except for the water as that is just background sound for the camera)
Here’s how the instructions will happen during the run.
Continue exploring:
Back to: Maneuvers - Course overview
Lesson 19 of 25

Frontal Collapse

PublishedOpen as studentEdit
Goal: Trust your gear. Lean back and enjoy the show.
A frontal collapse is a simple event if we catch the dive late. The reason frontal collapses tend to lead to cascade events is because pilots misjudge the timing of the catch and release. After a frontal collapse, there is a moment where the wing is trying to recover and has very little airspeed. If we apply brake at this moment, it will easily stall. This is one of the reasons why a late catch is so important.
Exercise:
To become comfortable with frontal collapses, follow these steps:
  • Release your brake handles and clip them back into their position.
  • Reach up to grab all A lines symmetrically.
  • Ensure that you are sitting naturally in your harness.
  • Make sure everything is symmetrical.
  • When ready, give a quick, strong pull and release the moment the wing collapses.
  • Lean back and enjoy the show.
Here’s a video of how it will look during the course
Continue exploring:
Back to:
Lesson 20 of 25

Asymmetric Collapse

PublishedOpen as studentEdit
Directional Control
Goal: To be able to control the flying side of our wing while experiencing a cravat.
In the event of a collapse near the terrain, our first priority is to maintain our heading and keep a safe distance from any obstacles. Afterward, we can address the cravat.
Exercise 1:
  • Pull and hold the collapse inward, then observe and react.
  • The collapse should be held for an extended period to allow the pilot enough time to understand what is happening and build their situational awareness.
  • Maintain a neutral position in the harness and observe the wing's behavior.
  • If the wing turns toward the collapsed side, apply weight shift to control it. If that is not sufficient, gently apply the outside brake to maintain your heading.
  • If the wing turns away from the collapsed side, lean into the collapse to maintain your heading.
  • Control the direction and roll of your wing while flying straight.
  • Note that not all wings will immediately turn toward the collapsed side, so it is important to observe before reacting.
Exercise 2:
  • Pull and hold the collapse inward, then observe and react.
  • Turn 180 and 360 degrees away from the collapse while keeping the wing stable.
  • The collapse should be held for an extended period to allow the pilot enough time to understand what is happening and build their situational awareness.
  • Stabilize the roll and maintain your heading. Once this is achieved, start turning away from the collapsed side using primarily weight shift, and add brake input as needed to execute the turn.
Here’s a video of this exercise during the SIV course.
Continue exploring:
Back to:
Lesson 21 of 25

Auto-Rotation

PublishedOpen as studentEdit
The leading cause of accidents in paragliding is auto-rotation. Our course will concentrate on techniques to avoid this situation, but as there are instances where it's unavoidable, we'll also cover how to safely and accurately exit an auto-rotation within a 90-degree turn.
To initiate auto-rotation, we'll induce a large asymmetric collapse and lean into it using our weight shift. We'll permit the wing to rotate, starting with a regular rotation and then transitioning into a SAT-like configuration. In this state, the collapsed side will face upwards, and the open side will face downwards. This will result in you flying backwards while your wing flies forwards.
Although attempting this maneuver might seem daunting, it's key to remember that the most energy is used during the transition from regular rotation to SAT. The SAT-like configuration involves less energy, but it can be disorienting as you'll be flying in the opposite direction to your wing.
To exit auto-rotation, we need to pull and hold the exit brake. This will compel the wing to exit the rotations. Once we hit the exit window, we release the brake entirely and regain smooth control, returning to directional control as in a standard asymmetric collapse exercise.
The exit brake here is the same brake as in Rapid Exit, the opposite one to the rotation. The input is not the same. In a rapid exit it is short. In an auto-rotation you pull it and hold it, and you keep holding it until the exit window.
Here’s how the auto-rotation work will look.
Here’s a video showing what happens if you over-react on exit.
Continue exploring:
Back to:
Lesson 22 of 25

Stall to Back-fly

PublishedOpen as studentEdit

GOAL: Clean entry, stable back-fly, clean exit.

Our goal is to find a clean entry and stable back-fly, as quick in and out of the back-fly is a “reset” button of the wing.
If you want to have a cravat, do a full stall. If you want to clear it, do a back-fly.

Here’s how we will go about it:

Take a good wrap -
Pierce it.
  • Swift and smooth action with brake input to pop the wing into stall, as we do that we will have a drop back, as the wing falls behind us.
Hands up then Chock it
  • As we have the drop back we go Hands Up.
  • As the wing wants to start moving forwards we Choke it - adding a touch of the brake input.
Hands down for tailslide.
  • As we start to fall under the wing we want to lower our hands to put the wing into back-fly. You’ll see the big ears pointing forward as you fly backwards.
  • Once in the back-fly we stay there for a bit to let the system to stabilize.
Ease up and let it fly.
  • Initial stage for exit, you let the wing pull your hands up a bit, as you feel it wanting to pull forward let it fly and look for a late catch and release right after.
Pierce it - UP - Choke it - Back-fly - Symmetry is key!
Here’s a video showing an example, where the pilot rushed it and was forced to re-stall to enter the back-fly.
Here’s another example what happens when you over stall the wing, by not going up enough and being a bit asymetric in your brake in-puts.
Continue exploring:
Back to:
Lesson 23 of 25

Spin Appreciation

PublishedOpen as studentEdit
Goal: To determine the exact location of our spin point.
When flying slowly, such as during thermalling, it is crucial to be able to identify when our wing is on the verge of spinning. Throughout this course, we will practice this skill in a safe manner.

Slow spin

Exercise 1:
  • Apply both brakes to slow down the wing.
  • While keeping the outside brake steady, apply more inside brake.
  • Focus on the inside wingtip.
  • The moment you notice the wingtip departing from flight, release both brakes.
  • Observe.
  • Catch and release.
Exercise 2:
  • Apply both brakes to reach the minimum speed.
  • Pull hard on one brake to initiate the spin, while releasing the other.
  • Hold down the brake on the spinning side for a brief moment.
  • Quickly release.
  • Observe.
  • Catch and release.
Exercise 3:
  • Apply both brakes to reach the minimum speed.
  • Pull hard on one brake to initiate the spin, while releasing the other.
  • Increase the duration of holding down the brake on the spinning side.
  • Quickly release.
  • Observe.
  • Catch and release.

Trim Speed Spin

Similar to slowed down variation, we will also work on just punching it through without slowing down the wing, this will increase the energy of the wings movment.
We will repeat these exercises, gradually increasing the duration of the wing's spin, until we achieve a full 180-degree spin.
Once the Spins are clean and the exits are also clean, we can then swing under the wing and in the next back pitch spin it again, to connect multiple spins one after the other.
By understanding the spin point, we will be able to utilize spinning to avoid collisions.

Cravat Clearing

Goal: To be able to clear wingtip cravats mid flight.
Slow down both sides of the wing, pierce one side into spin/stall - let it fly.
Continue exploring:
Back to: Maneuvers - Course overview

The mental side of flying

2 lessons
Lesson 24 of 25

Doctor's Recommendation

PublishedOpen as studentEdit
Dr Matt Wilkes is a doctor specialising in human performance in extreme environments.
He has a masters degree in Mountain Medicine, and a PhD in pilot physiology and safety. He has been the leader of several large international expeditions, run high altitude clinics in Nepal and flown all over East Africa with the AMREF Flying Doctors. He is a contributor to Cross Country Magazine and advises the British Paragliding Racing Academy.
Dr Matt Wilkes - SIV AdvicePDF file
Below is a video of Dr Matt Wilkes's reserve parachute research, the largest study of its kind in paragliding history.
It is well worth watching and highlights so many important points. This video can help you understand your natural instincts so you can start to practice, visualize and react in the right way when you need it the most.
This link is to a podcast where Matt explains first-aid protocols in canopy sports.
Here’s a link to Matt and Karlis chatting about First Aid for paragliding.
Below this point are all of the scientific papers relating to the articles and videos above. I have put them here so you can dig deeper into the science and work that has gone into collecting this data if you so wish. They might be a hard read especially if English isn’t your first language but they are there if you want to know more.
Research paper: Paraglider Reserve Parachute Deployment Under Radial Acceleration
Research: Reserve Parachute Deployment Under Radial AccelerationFile kept on the live site
Research paper: Ergonomics of paragliding reserve parachute deployment in linear acceleration
Research: Ergonomics of Reserve Deployment in Linear AccelerationPDF file
Research paper: The Physiology of Paragliding Flight at Moderate and Extreme Altitudes
Research: Physiology of Paragliding Flight at Moderate & Extreme AltitudesPDF file
Research Paper: Natural Climbers - Insights from Avian Physiology at High Altitude
Research: Natural Climbers - Avian Physiology at High AltitudePDF file
Research Paper: Cognitive Function in Simulated Paragliding Flight
Research: Cognitive Function in Simulated Paragliding FlightPDF file
Research paper: Quantifying Risk in Air Sports - Flying Activity and Incident Rates in Paragliding
Research: Quantifying Risk in Air SportsPDF file
Continue exploring:
Lesson 25 of 25

Learning under stress

PublishedOpen as studentEdit
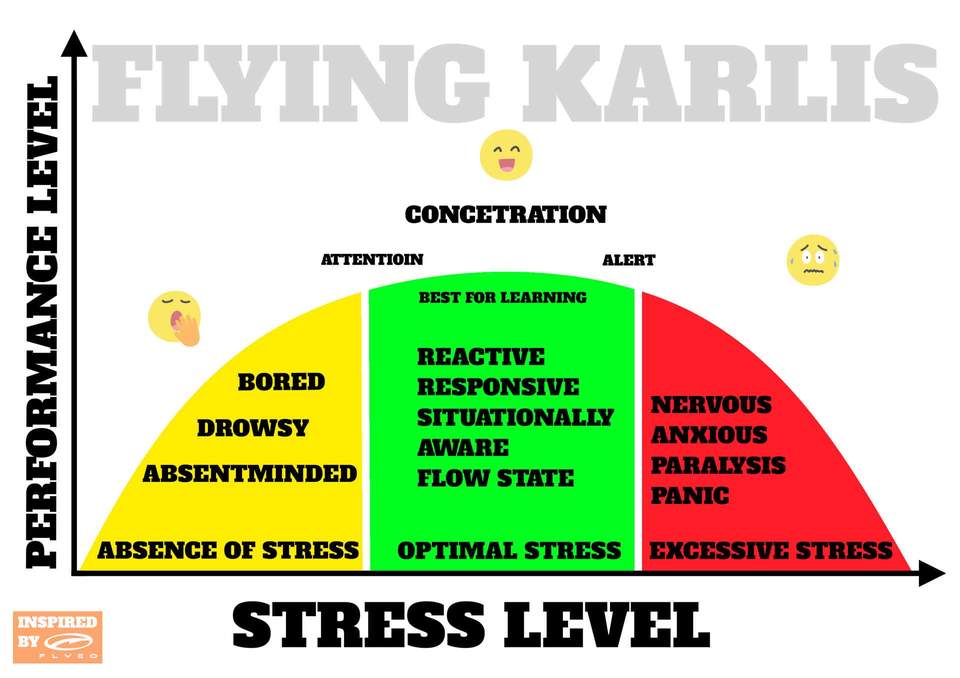
The area with the greatest learning potential is when you are stimulated but not overly stressed. When going into SIV (Simulation d'Incident en Vol), it is expected to experience increased stress levels, leading to nervousness and anxiety. The goal is to avoid reaching the stage of panic and paralysis. However, excessive stress releases chemicals into our blood, which is not conducive to learning and can result in tunnel vision. Consequently, many details may be overlooked, requiring repetition to reinforce learning. Through repetition, we learn to overcome fear and enter a state of optimal learning.
Building our "bubble" is crucial in this process. Initially, when performing a maneuver, we may have limited awareness of factors such as height loss, brake pressure, or limb positioning. Gradually, as we become more familiar with these elements, our bubble expands. This means that we gain a better understanding of our actions and surroundings. SIV involves navigating through this potentially dangerous stage to learn how we will react to different paragliding situations.
However, it is important to note that we can also push ourselves too far in SIV, risking accidents. As our training progresses, we rely more on muscle memory and situational awareness. This allows us to anticipate certain outcomes based on familiar sensations and frees up mental capacity to observe our surroundings, monitor altitude loss, and make decisions such as deploying the reserve parachute. By expanding our bandwidth, we can focus on the bigger picture rather than being narrowly fixated on immediate circumstances.
The key lies in recognizing where we are on this learning curve. It is necessary to experience some level of stress (in the red zone) during SIV but then use repetition to return to the optimal learning state (the green zone) where we are alert and aware of our surroundings.
Stress levels diagram showing learning zones - optimal stress state and panic zone
Continue exploring: